Import L5K 
See also: Networking and Communications
Topic Menu
Data Exchange Using Logix CPU Tags

|
Hands-on: Exchange Rockwell Logix CPU Tags with the Horner OCS |
The latest Horner Controllers (RCC series, X5, XL4, EXL6, XL7, EXL10 & ZX) support the ability to exchange Global Tags with Rockwell Automation Logix Processors over an Ethernet IP network. This capability was added with the release of Cscape 9.70 SP1. The Global Tags, once imported into Cscape – can be displayed on the OCS screen by being tied to any read-only or editable graphics object. Through this same method, the Global Tags can be referenced from graphics objects on WebMI screens as well. As an additional capability, the Global Tags can be fully mapped into local OCS reference space (%R, %AI, etc.) This provides the added capability of including Global Tag sourced data into OCS Datalogs, Emails, Logic Programs, etc. Once imported into Cscape, the Global Tags are updated automatically in the background about every 25mS.
The following resources are needed to configure Logix Tag Exchange:
-
RCC, X5, XL4, EXL6, EXLW, XL7, EXL10 or ZX with firmware 14.18 or later
-
Cscape v9.70 SP1 or later required
-
Appropriate Rockwell Automation Programming software for Logix CPUs
Configuration and Import Procedure
To configure Logix Tag Exchange communication over Ethernet IP, complete the following:
Step 1: Save the Project running on the Rockwell Logix CPU as a L5K file.
Step 2: Confirm Firmware Version 14.18 or later is loaded to the OCS.
Step 3: Open Cscape 9.70 SP1 or later.
Step 4: Select Home > Program Import Tags from L5K File to configure Ethernet protocol.
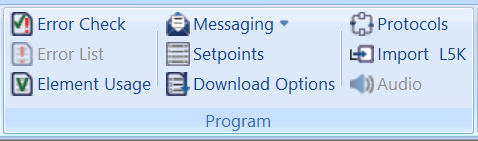
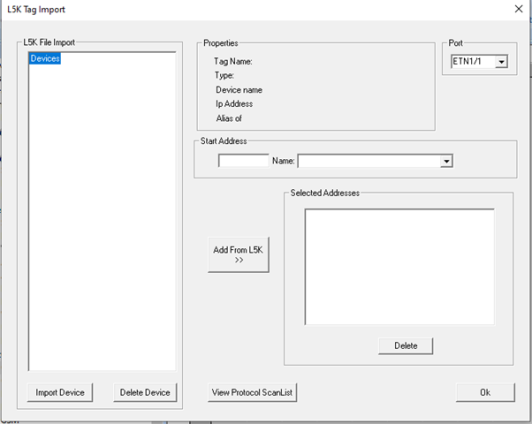
Click Import Device from the window below:
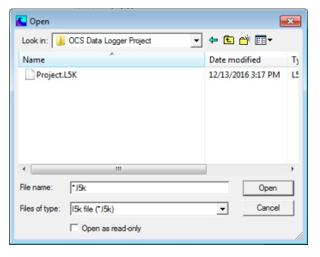
Step 5: An Open window is displayed. Browse to the appropriate location, and select the desired L5K file, and click Open.
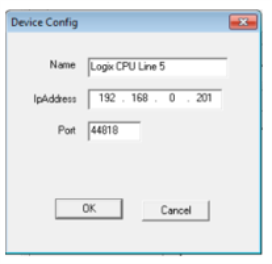
Step 6: The Name, IP Address, and Port configuration for the Rockwell Logix CPU will be displayed. Click OK, and the Global Tags from the Logix CPU will be displayed on the next window. If the IP is not display, IP address of Rockwell Logix CPU should be manually entered. Some L5K files for controllers, like flex Logix, do not export the IP address, thus the need to be manually entered.
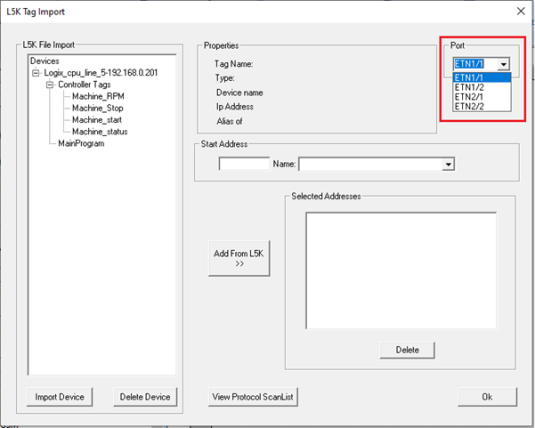
Step 7: More/Less tags can be displayed in the L5K File Import pane by pressing the [+] and [-] boxes on the tag list (the example below shows only 4 tags – but typical applications will have dozens or even hundreds). At this point, it is important to ensure the Logix Tag Exchange is tied to the appropriate LAN port on the OCS. The Port pull-down list displays the four possible assignments. For controllers with a single LAN port, the choices will be ETN1/1 and ETN1/2. ETN1/1 will be selected if Logix Tag Exchange will be the first downloadable protocol assigned to the LAN1 port. ETN1/2 will be selected if another downloadable protocol (such as Modbus TCP Client) has already been configured as the first downloadable protocol assigned to the LAN1 port. Controllers with LAN2 ports will list ETN2/1 and ETN2/2 assignments as well.
Step 8: After selecting the Port, some applications can be completed simply by clicking OK (read the following before proceeding). Applications strictly displaying Logix Tags on OCS Screens or WebMI Pages do not require any further configuration (just click OK). Applications using Logix Tag data inside their OCS program for datalogging or program logic require an additional step – mapping the Logix Tags into OCS Reference/Register space.
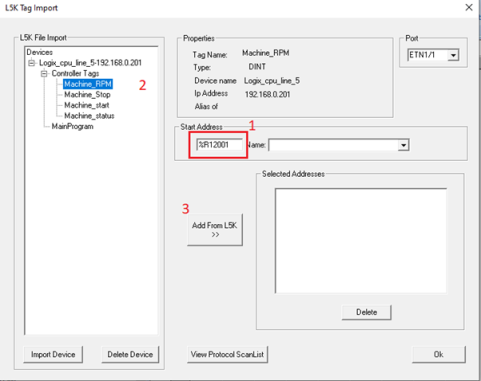
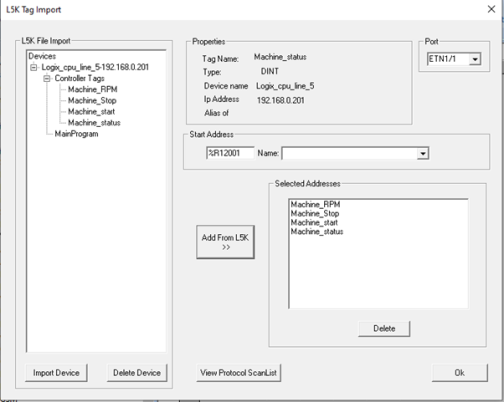
Step 9: In this step, we will take the extra step of mapping the Logix Tags to OCS Register space. First assign a Starting Register (Step 1 above). This will be the starting register for the entire list of tags that will subsequently be mapped. This step only needs to be completed once. Next, Select the first Tag to be imported in the L5K Import Pane (Step 2 above). Next, Click Add from L5K (Step 3 above). This will perform the mapping for the selected tag, and it will appear in the Selected/Addresses pane. Now repeat steps 2 and 3 until all desired tags are mapped (see below). Click OK to complete the mapping process.
Step 10: Now verify that everything mapped correctly. Click Controller Hardware Configuration to display the Hardware Configuration dialog box. See also: Hardware Configuration .
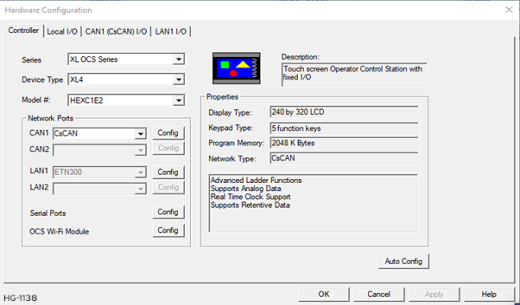
Step 11: Click on the Config button for the LAN port to which the Logix Tag Exchange was assigned, either LAN1 or LAN2.

Step 12: EipcClient vX.XX should be displayed in the appropriate Downloadable Protocols pull-down list. This stands for “Ethernet IP Client” with the version of the Protocol Driver also listed. In the case of this protocol, the Network button has no meaning. Click Devices to view the next dialog box.
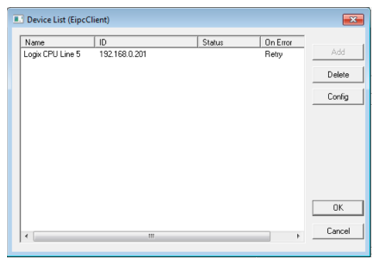
Step 13: The Device List dialog should list the Name and ID (IP Address) of the Logix CPU. Now click OK to return to the LAN1 Configuration dialog box. This time, click Scan List to display the following dialog box.
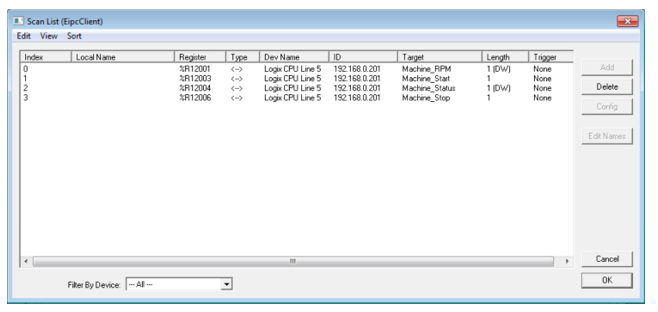
Step 14: The Scan List dialog box shows the detailed mapping of each imported tag. This includes the specific Register mapped to the tag, Logix CPU Name it is associated with (Dev Name), the name of the tag (Target), and its Length in Words or Double Words (DW). Tags that are 1-bit, 8-bit, or 16-bits in length are mapped to a complete 16-bit Register. Tags that are 32-bits in length are mapped to a single double-word (stored in two consecutive 16-bit registers above).
NOTE: Local Names (I/O Names) for the mapped register are NOT automatically created – as of version 3.21 of the Ethernet IP Client driver. This capability will be added in a future release of the driver.
Return to the Top: Import L5K
Accessing Imported Logix Tags through Cscape
Now that Logix Tags have been imported into the Cscape project, they can be tied to graphics objects on OCS Screens, and on WebMI Web Pages. The procedure is exactly the same whether creating screens to download to the OCS, or creating screens that are to be published as Web Pages. :
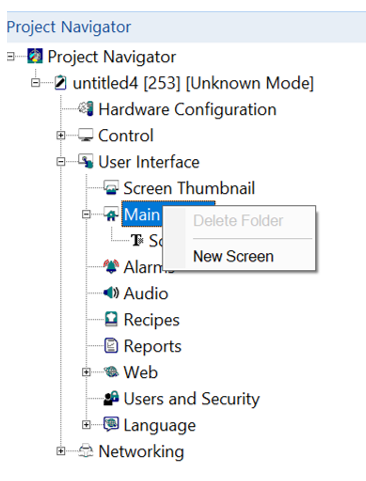
Step 1: Open the Project Navigator and the User Interface Node. Right-click on Main Screen and select New Screen.
Step 2: Select a Graphic Objectthrough the Project Toolbox. To place the object, click and hold somewhere on the screen, then drag from top > left to bottom > right to size the object. Release the mouse, then double-click the object to configure it.

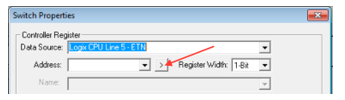
Step 3: In the Controller Register section of the dialog box, examine the Data Source pull-down list, and select the Logix CPU data source from the list.
Step 4: Next to the Address field, click on the arrow icon:
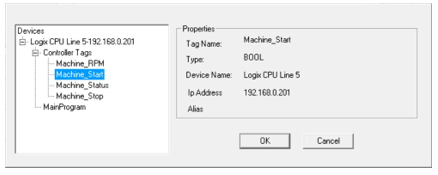
Step 5: A dialog is displayed which will allow you to browse the tags that were imported for the Logix CPU selected. Navigate the Devices pane, pressing the [+] symbols as necessary to find the desired tag. In this case, the Machine_Start tag is the desired data source for the Switch Object being configured. Select the tag, then click OK.
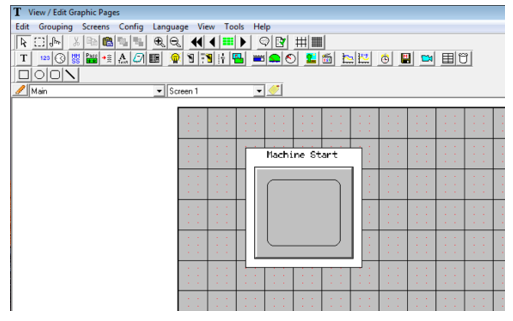
Step 6: The selected tag (in this case Machine_Start) is now linked to the Switch Object on the screen. Complete the configuration of the Switch Object by assigning a Legend, and changing the style (ie shape, color) and operation (i.e. momentary, toggle) of the button as desired. Click OK when complete.
Step 7: At run-time, whenever the switch is operated from the touch screen – the OCS will write a 1 to the Machine_Start tag. When the button is released, the OCS will write a 0 to the same tag.
Return to the Top: Import L5K
Accessing Imported Logix Tags without Cscape
How to access the Imported Logix Tags from the Logic Editor, Data Logger, Email or Email Configuration. The Cscape Graphics Editor has the ability to directly access Logix Tags that have been imported, whether or not the tags have being fully mapped into OCS Register space. When accessing tags from other aspects of Cscape, including the Cscape Logic editor, Datalogging Configuration, or Email configuration – Cscape can only access the Local OCS Registers / Local I/O Names where imported tags were mapped.
Return to the Ethernet IP Client Scan List. Click Controller > Hardware Configuration, Click Config next to the appropriate LAN port, and click Scan List next to the Ethernet IP Client Downloadable Protocol.
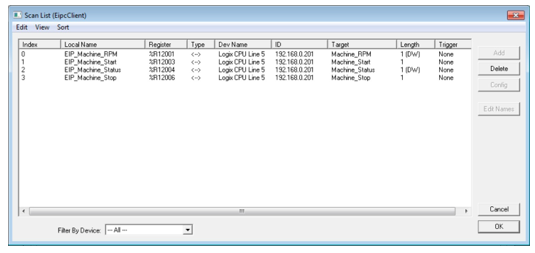
Once again, the Scan List dialog displays the details of the mapping of the imported Logix tags and local OCS register space. Since the last time we examined this dialog, the local OCS registers were manually assigned Local I/O Names (this does not yet happen automatically as of Cscape 9.7 SP2). To reduce confusion, Local I/O Names were configured with the same name as the Logix Tag, but with an added Prefix.
-
When accessing Logix Tag data from an OCS Screen or WebMI web page, EITHER the direct Logix Tag Name OR the Local Register / Local I/O Name may be referenced. The Cscape Graphics Editor has the ability to access the data either way via the procedures outlined in Section 4.0.
-
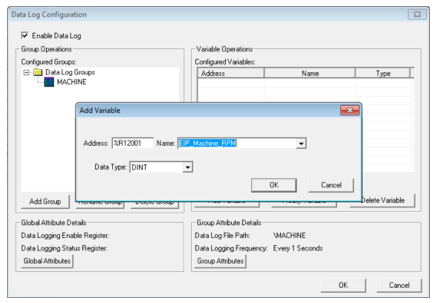
When accessing Logix Tag data from anywhere else in the OCS, the Local Register / Local I/O Name must be referenced. In our example, to configure an OCS Datalog to include data whose source is the Machine_RPM tag, local Register %R12001 (with Local I/O Name EIP_Machine_RPM) must be added to the Datalog.
Return to the Top: Import L5K
Hints to Create Local I/O Names
When Mapping Logix Tags into OCS Register space (see Section 3, Step 9 above), it may be desired to import tags in order of data length. In other words, it may be desired to map bit-length tags first, followed by word-length tags, double-word length tags, etc. This will make mapping more efficient and may make it easier to add local OCS I/O Names later in a semi-automated fashion.
Tags and Comments can be exported from the Rockwell Project in .csv format. Cscape can import I/O Names from the Windows clipboard, typically copied from a spreadsheet. The following procedure will help minimize the effort required to enter Local OCS I/O Names for each of the imported and mapped Logix Tags. Follow the steps below:
-
From the Rockwell Software, open your project and Export Tags and Local Comments from the Tools Menu.
-
Open a copy of the exported .csv file in Excel.
-
Delete all Rows except the Rows containing Global Tags that have been imported and mapped into Cscape. If the Rows are in the order that the Tags were imported into Cscape - that will make things easier when you fill in the details later.
-
The imported Tag Names should be in Column C, and the Comments in Column D.
-
Clear Contents (don’t delete) Columns A & B, because those need to be redefined for I/O Name import into Cscape. Columns C and later can be left in their current form.
-
In Column A, fill in the OCS Register references, using the complete designation including percent sign (i.e., %R12001, %R12003, etc.). For bit-length Tags, Cscape will allocate an entire word register for the import, but the Boolean data is most easily referenced from the least-significant bit of the register. In other words, even though Cscape maps all of %R12003 for the Machine_Start tag, since it is a BOOL type variable, the I/O Name would be best mapped to %R12003.1, which references the least significant bit only.
-
In Column B, fill in the I/O Name length designation associated with that tag (1, 16 or 32). For example, use 1 for any bit-length tags, 16 for any word-length tags, and 32 for any double-word or floating point tags.
-
In column C, if you decide to add a prefix to the Tag names to differentiate them from their exact Logix Tag name, you may do so now. You may also choose to simply leave the Local OCS I/O Name and Logix Tag Name identical.
-
Once finished, re-examine your work – making sure that the mapping and lengths are correct.
-
Highlight columns A through D only, and perform a Copy (CTRL-C)

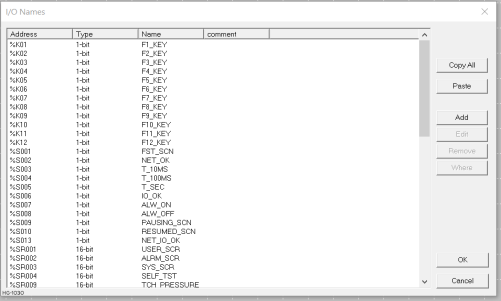
In Cscape, click Program > I/O Names to bring up the I/O Names dialog box.
-
Click Paste.
-
Cscape will display a Message “Are you sure you want to paste I/O names from the clipboard and overwrite any duplicate names?”. If you are sure, Click Yes. After examining the imported I/O Names, click OK to complete the process. See image below:
Return to the Top: Import L5K